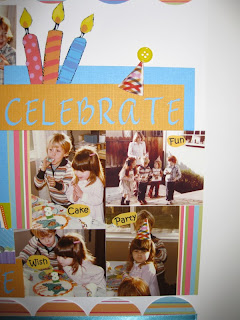
As you know, for my birthday, my dear friend Claudia signed us up for a scrapbooking class, where we made a two page layout using a new product line from Basic Grey. This was the first time I've ever taken a scrapbooking class and the first time I've ever worked with Basic Grey.
Now these photos really are bad (forgive me). Here is the layout:
I like to try something new every time I complete a layout (which isn't hard because there is a very long list of things I want to try and I'm a relative amateur). This time, I tried incorporating hidden journaling with the use of a file folder. See below:
As you can see, I had a few extra photos I wanted to add but didn't want to overclutter the layout any more than I already have. I thought this was the perfect solution.
Claudia and I had a ball. She actually taught me how to use my paper trimmer properly (don't ask) and I showed her how to distress edges.
If I learned anything from taking the class, it's that I'm very slow, and I'm not good at replicating the sample. I found myself making lots of variations, and scrapping (excuse the pun) certain elements all together in favor of my own crazy ideas. I also learned that I need to practice the art of "pen" stitching (though something tells me Hanna really isn't going to care).
Wait, a scrapbooker who isn't a perfectionist?
Hear me roar.
Tuesday, January 19, 2010
Sunday, January 17, 2010
Theresa's recent cards (non-kit)
These are some cards I made recently. The wedding one is the only one I really like. Sorry for the low picture quality. I must recruit A. to take my pictures from now on...
For a friend's wedding.
A quick birthday card. I've noticed a trend where the more intricate the envelope is (sitting under the card) - the more simple the card becomes.
A couple of general cards (for my mom to use).
This one is also for my mom to use. Inside she wrote out a quote from a book she's reading. It's a TY card for someone at her church.
This is just playing. I tried these stamps for the first time - and distressing paper for the first time too. I have silver paper lining the card inside (to write on) and the envelope is silver too.
Wednesday, January 13, 2010
Theresa's 2010 Card
Here's Theresa's 2010 Card. I thought it was very cute. My favorite part is the swinging 2010 and how it moves freely. I also like these colors together. (I thought about blurring the part of the photo showing the message written inside but decided to just leave it since it wasn't too personal. If you want me to blur it, I can edit this post. Please let me know.)
Friday, January 8, 2010
Change in Rules?
So the only rules I can think of to maybe change are the rules regarding tools. I like having to stick with only the materials that come in the kit, but I was wondering how you both felt about changing the rules slightly to allow for usage of any tools? I know I wanted to reach for my border punches a zillion times. Maybe we could all consider how it would change things and whether those changes would be acceptable.
I've considered it some and here's how I feel: The intent of the club is to see what we can make with the same materials...well, tools don't really impact it that much. So we use punches, dies, or cutting machines. Big deal. My flower and title might have looked more professional and my layout may have changed slightly - I probably would have used a border punch and perhaps a die or two - that's about it. I knew the basic form my layout was going to take, regardless of tools. I knew what my cards were going to look like, too. It was neat to be reminded that, yes, you can do a lot without tools, but is that a reason to revert back to the stone age of scrapbooking? On the other hand, I liked being challenged by not being able to reach for my old stand-bys right away. It forced me to think a little. But, I'm not sure if what I gained in creativity made up for the lack of ease in using tools. What do you guys think?
Should we relax the rules on the usage of tools? Or do boundaries encourage your creativity and we should keep them?
Thank You!
Thank you to both of you for participating (nay, embracing) this crazy idea of mine. I can't believe what we've created. Everything is so unique and wonderful. And I love how both of you have inspired me to go beyond my normal boundaries. I can't wait for next month's results.
As long as we're all interested, I'd be happy to finish out the year. If you want to add a kit, T, that'd be great, just let me know if you want a particular month Aug - Dec. If not, I have no problem finishing them up since I was going to anyway.
Thursday, January 7, 2010
Theresa's January results...
2Hello ladies!
I hope you like what I've created for January. I'm going to post them with a note showing what order they were created in (a total of 7 pieces). I don't know if this is valuable information or not, but I found that what I did for the previous item shaped what I could (or could not) do for the rest.
First layout (Item 1/7)
This was just close to my heart. This coming weekend would have marked my father's 69th birthday. I miss him a whole lot. When I saw the "celebrate life" title I wanted to make a little something to celebrate his life, even though he has passed away. This was one of my favorite pictures of him, taken at Natural Bridges in Santa Cruz on my 25th birthday (I was just getting into photography, and developing my own black and white film back then).
Second Layout (Item 7/7)
After items 1-6, I had all of these great pieces of paper left over. I wanted to make a cover page for the book I bought to hold all of my ORMV layout pages. I wanted to reference some of the general info and rules (like what items we're allowed to use). I thought this would be a creative way to do it. Some of the layout is blurred out because it contains our contact info. However, you can see the full layout as a PDF in our joint email account (sent file). I created it all using a few basic MS fonts, just different sizes and orientations. I printed the layout on vellum and put it over a graphic I created with some of my left over pieces (and embellished with the same). What do you think?
First Card (Item 2/7)
So, I really had *no* idea what to do with the candles/stars black paper. I liked some of the candle graphics (and Anth mentioned that some of them were lined similar to cartoon drawings of chromosomes). When tightly wound DNA on chromosomes is usually depicted it looks like this:
I hand cut (without tracing anything... all freehand) - all of these itty bitty "chromosomes" out of the candles on the black paper. I made this card to "CELEBRATE LIFE" because one of my close friends (also Rachael, but with an extra "a") is pregnant and due soon. She works in the biotech industry with me and her husband is a scientist (PhD) at UCSF. I thought they would appreciate the "celebrate life" theme coupled with hand-cut chromosomes. Pretty nerdy, huh? (I secretly love it; it's my favorite this month.)
Here is the inside. Also created using basic MS fonts. I need to learn to take pictures before I use the cards next time! :-)
Second Card (3/7)
I just don't even know what I was thinking here. I didn't think about about tracing and cutting shapes at this point, but knew we could use circle cuts. For some reason trees and birds came to me. I free-hand cut everything except the circles (and the pre-made stickers). It shows. :-P
Third Card (4/7)
At this point I was just pretty damned determined to use the piggys and all of the good stuff I had left in the pack. I don't think this is all that creative though. It has taught me to wait until inspiration comes.
Fourth Card (5/7)
Another birthday card, with similar motivation to 4/7. Passable. Not my favorite in the group.
I do like how shredding the blue ribbon made cute balloon strings though.
Fifth Card (6/7)
This is all free-hand cut, except the scallop and blue circles - and of course it shows. However, for some reason, I like it anyway. I didn't know what to do with the flames from the black paper, but I really wanted to use them. S0... they became a flower, which was turned into a little card. It doesn't have any sentiment in it - so I could use it for anything really.
So, that's all for January. I am still stumped for most of the Feb. materials. I didn't really think about tracing line drawings. I may give that a try. Until next time... Happy Crafting!
With love and curly cutz,
Theresa
Rachel's January Results
Okay, Marieke, color me humbled. I only managed to churn out one layout and one card, though now that I've seen Marieke's cards I'm feeling pretty inspired to make some more.
Here is my layout ("Celebrate Three Years of Life"):
And a closer view of some of the details:
This is the first time I've ever used photo titles. Or the negative of a cut-out title. I also had a lot of fun with my circle punch, as you may notice. The hat above the title is cut out from a double of one of the photos. I also decided to cut the blue ribbon in half to use as a border.
Here is my card:
As you can see, it's pretty simple. I know you're loving the hand doodled swirls on the pink present (and I hope you realized they're presents. My mom didn't).
That's it.
Okay, Theresa, we can't wait to see what you made! :)
Rachel
Marieke's January Results
So, I tried to use up every last thing in the kit. Once I got started, there was no stopping me. I ended up with 1 layout and 8 cards.
Details of the cards:
Here is what I printed and traced:
I printed the "1st" out in Verdana, font size 120. Then I did a search for flower line drawings and printed out the image, then traced and cut.
The other fonts I used on the cards were Curlz MT, Matisse ITC, and Comic Sans MS.
Here are my leftovers:
Wednesday, January 6, 2010
Anticipation...
Happy (belated) Birthday Rachel!
I am excited about seeing your January crafts ladies! One more day to go...
(Theresa)
I am excited about seeing your January crafts ladies! One more day to go...
(Theresa)
Friday, January 1, 2010
January Kit
Happy Birthday
Okay, so we all know someone who is getting older this year. I thought the best way to start our new club is to get prepared for the upcoming year and make a birthday craft or two. Have fun!
And btw...
HAPPY BIRTHDAY, RACH!!!!!
Here are pics of the kit. If you are missing anything, please let me know.
1. Paper - 4 12x12 Sheets (2 plain, 2 patterned)
2. Additional Paper Items - 3 4x6 sheets of paper (plain, but 2 have sides that reverse to different colors)
3. Ribbon - 1 fat (blue), 2 thin (yellow and kelly green)
4. Brads - 4 brass stars and 4 blue
5. Bling - 3 yellow buttons
6. Embellishments - 2 3-D embellishments (present and candles), 1 sheets of cardstock stickers (birthday themed), and 1 stamped image (party pigs)
7. Titles - 2 (1 "Celebrate Life" Cricut cut-out and 1 "Happy Birthday" from sticker sheet)
8. Phrases - 1 sheet of printed birthday themed words and 2 embossed "Happy Birthday" sentiments.
Subscribe to:
Posts (Atom)