


LAYOUT
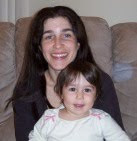
 This layout is for the album I am working on for Kurt. This photo was taken around 1978. The journaling reads, "This is Cyn with her friend's baby. Cyn must have made a wish for her very own sweet baby this day because about a year later, Spencer was born. That's the way it usually happens. A woman holds a baby and soon she has her very own." The journaling was based on what Kurt told me about the photo as we were going through his albums at Christmas.
I scraplifted this layout from one of my favorite scrapbookers, Gabrielle Pollacco. You can see the layout by clicking here to go to her blog, Such a Pretty Mess. She designs for the kit of the month club, My Creative Scrapbook, which sells the most delicious (if spendy) kits around.
I like how the layout turned out overall. If I could change anything, it would be the distressing on the polka dot paper. I think it's a bit too heavy and it looks even heavier photographed - it's not as bad in person. It also looks slightly orange in the photo and it definitely is not in real life. I guess photos can lie.
I took a nail file to the brown paper to get to the white core. Gotta love white core paper for distressing.
I edged the brown patterned paper with a gold metallic pen.
I used circles for the white scallop border and did a search for "scrapbook borders" for the scalloped border above it. Here's the image I used:
 I pasted the image to a word document, sized it to how large I wanted the scallops, printed it, then cut out the scalloped edge. Then I traced the pattern onto the pink paper. I had to repeat it since it wan't 12 inches long. Then I cut that out, and distressed the edge in pink ink. I love how distressing hides the major hand-cutting flaws.
I turned the square bird tag into a circle and colored in the flowers.
The hearts are hand drawn and cut out, then distressed.
The large flowers were made from templates using images from on-line. I created a striped paper for one, using cream cardstock I distressed and striped with a red pen. I used the pink organza ribbon as one of the flower centers, by gathering it with thread. Since the rules allow for stitching I decided to go ahead and stitch the ribbon into a rosette. I triple stacked the white die-cut flowers to get some dimension.
CARDS

I hadn't realized how autumnal these colors were until Spencer pointed it out to me, but they do look very fall-like to me all together like this.
 This is my favorite card. This is the first card I've created without scraplifting and I really like how it turned out. I had created the flower for the layout but decided against using it there and included it here instead. I colored in the heart with a red pen.
 Probably my next favorite card. I liked how this turned out a lot. I hadn't originally thought of this sentiment or title for use on a card but I like it. I created the mat using white cardstock, which I then colored red at the edges. Same thing with the flower's center. I definitely should have included red cardstock with this kit. Live and learn.
 I saw this idea in a magazine and decided to go for it. Not sure about this one. I think this idea would work better on a larger card, using smaller punch-outs.
 Eh, meh. This feels so boring to me. I feel like I've done this a thousand times before. Nothing new to see here, folks.
 Also something I saw in a magazine. I like repeating patterns and thought this came out cute. I wish I had put the ribbon up a little higher in the center of the pink section so you could see it better, but other than that it's fine. It's nice to have a few blank cards around.
So this month, I used almost everything in the kit. I only have a couple of wish phrases left. Not too shabby and much better than last month. Cant's wait to see your paper goodies, girls. :-)
I love this layout. It's the "messiest" thing I've ever seen you do, and I mean that as a compliment. I love the idea of using brads to make a corner. I love the flowers and haven't a clue how you made them. I love the distressed elements; especially the sanded brown cardstock to expose the white core underneath. I've been wanting to try that but am still too chicken. What a beautiful photo. I really like how it goes with the theme.
ReplyDeleteOn the sending you smiles card, I really like how you used red ink to distress the edges, I think it adds a lot. And the peekaboo thank you card is so cool - what a great use of the circle punch. I also like repeating patterns, and I like how you changed it up by using the "striped" bird for the center to add texture and interest. I love how you colored in the hole punches with red marker on the stamped image bird card.
You are amazing!
I love the March kit too. It was my favorite from the beginning - but it too me so long to get to it.
ReplyDeleteI love all of the distressing you did. I dig that style, so I'll have to get more info on how you distressed and inked your edges so artfully (scrapping: beyond the nail file). :-)
I missed this so much. Thank you for your creativity and inspiring mine.